Introduction
In the last chapter, we blocked out the first view in our app, the Edit Hike view. This was a simple view that displays a single hike, as well as lets us edit that hike. This is a great start, but for our app, we need to be able to select one of many hikes and edit them individually.
In this chapter, that's exactly what we're going to do. To make sure things will be easy to manage, we'll still be keeping everything in our MainView.ux file. We'll add a "selector" at the top of the view that allows us to select which hike we want to edit, and then our edit hike view from the last chapter will be populated with this data. Changes will not be persistent yet - we'll simply be loading data from our model, but not storing it back. We'll solve that in a later chapter about mocking our backend.
The final code for this chapter is available here.
Creating our List of Hikes
In order for us to display a list of hikes to choose from, we first need a list of hikes.
We start by creating a new class that models a single hike. This could be put in its own JavaScript file, but for simplicity, we are just going to put it right over our App class in App.js.
class Hike {
    constructor(name, location, distance, rating, comments) {
        this.name = name;
        this.location = location;
        this.distance = distance;
        this.rating = rating;
        this.comments = comments;
    }
}
We then modify the contructor of App to use this new class instead just listing all its individual fields.
export default class App {
    constructor() {
        this.hike = new Hike("Tricky Trails",
                 "Lakebed, Utah",
                 10.4,
                 4,
                 "This hike was nice and hike-like. Glad I didn't bring a bike.");
    }
}
Finally we need to update our UX to look for its data bindings in the hike field:
<Text>Name:</Text>
<TextBox Value="{hike.name}" />

<Text>Location:</Text>
<TextBox Value="{hike.location}" />

<Text>Distance (km):</Text>
<TextBox Value="{hike.distance}" InputHint="Decimal" />

<Text>Rating:</Text>
<TextBox Value="{hike.rating}" InputHint="Integer" />

<Text>Comments:</Text>
<TextView Value="{hike.comments}" TextWrapping="Wrap" />
At this point, we are ready to add more hikes to our model. At first, we'll just use a simple array of hikes. We start by adding the following set of hikes to our App.js file:
constructor() {
    this.hike = new Hike(
        "Tricky Trails",
        "Lakebed, Utah",
        10.4,
        4,
        "This hike was nice and hike-like. Glad I didn't bring a bike."
    );
    this.hikes = [
        new Hike(
            "Tricky Trails",
            "Lakebed, Utah",
            10.4,
            4,
            "This hike was nice and hike-like. Glad I didn't bring a bike."
        ),
        new Hike(
            "Mondo Mountains",
            "Black Hills, South Dakota",
            20.86,
            3,
            "Not the best, but would probably do again. Note to self: don't forget the sandwiches next time."
        ),
        new Hike(
            "Pesky Peaks",
            "Bergenhagen, Norway",
            8.2,
            5,
            "Short but SO sweet!!"
        ),
        new Hike(
            "Rad Rivers",
            "Moriyama, Japan",
            12.3,
            4,
            "Took my time with this one. Great view!"
        ),
        new Hike(
            "Dangerous Dirt",
            "Cactus, Arizona",
            19.34,
            2,
            "Too long, too hot. Also that snakebite wasn't very fun."
        )
    ];
}
Displaying our List of Hikes
Now that we've got our list of hikes, we'll make a simple view to display them.
Since we want to be able to select one of the hikes we're displaying, we'll display each hike as a button that, when pressed, will select that specific hike and populate the edit hike view.
First, we'll just display our array of hikes as buttons. But how do we do that in UX? For these kinds of scenarios, UX provides a very helpful mechanism called Each:
<ScrollView>
    <StackPanel>
        <Each Items="{hikes}">
        </Each>

        <Text Value="{name}" />
Each is a very powerful UX feature. What Each does is take the collection specified by its Items property and project each item into a copy of the visual subtree inside the Each tag. We can think of it kind of like copying and pasting the code inside Each for each item in Items.
In our case, we'll use Each to create a Button for each of our hikes whose Text will be set to that hike's name. That will look like this:
<Each Items="{hikes}">
    <Button Text="{name}" />
</Each>
If we save here, we can see that now Each has created a Button for each item in hikes, just like we expected. Cool! This works for pretty much all code we can put inside Each, but in our case one Button for each hike is all we need.
Notice how we also databound each Button's Text property to name. One of the awesome things about Each is that for each of our Items, Each will "narrow down" the data context that we're binding to to be the current item. So when we bind to name in this context, we're binding to the name property of the current item, which in this case is the current hike. It's that easy!
Selecting Hikes
Now that we've got a button for each of the hikes in our model, we want to be able to select one by clicking one of these buttons.
We already have a field in our model that represents the current hike. Now we need a way to change the value behind this field, when one of our items is clicked.
We'll start by creating an empty method in our App class, which we'll fill in in a moment:
chooseHike() {

}
And we'll go ahead and hook up all of our buttons to it like this:
<Button Text="{name}" Clicked="{chooseHike}" />Now it's time to fill in our function. The basic idea is that we'll fill in the value of our hike field:
chooseHike() {
    this.hike = ???
}
But what will we set it to, exactly? As it turns out, when we databind a function to Clicked on a Button, that function can receive an argument. This argument contains a data field, which will represent the current data context for the Button. And because of the way we've used Each, that means that data will actually be the hike we're after. Cool! So, let's update our function to accept that argument and put its data property into our hike field:
chooseHike(arg) {
    this.hike = arg.data;
}
And now when we save this, we can see that our hike selectors work as we expect! When we click on one of them, the edit hike view gets populated properly and we can edit the individual fields. Cool!
Our progress so far
So now we've started to get a basic model made up of many hikes, a view to select one of these hikes, and a view to edit the selected hike. Altogether, it looks like this:
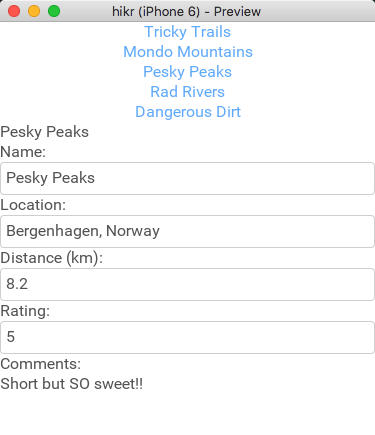
The code hasn't grown too much, either. It looks like this:
<App Model="App">
    <ClientPanel>
        <ScrollView>
            <StackPanel>
                <Each Items="{hikes}">
                    <Button Text="{name}" Clicked="{chooseHike}" />
                </Each>

                <Text>Name:</Text>
                <TextBox Value="{hike.name}" />

                <Text>Location:</Text>
                <TextBox Value="{hike.location}" />

                <Text>Distance (km):</Text>
                <TextBox Value="{hike.distance}" InputHint="Decimal" />

                <Text>Rating:</Text>
                <TextBox Value="{hike.rating}" InputHint="Integer" />

                <Text>Comments:</Text>
                <TextView Value="{hike.comments}" TextWrapping="Wrap" />
            </StackPanel>
        </ScrollView>
    </ClientPanel>
</App>
class Hike {
constructor(name, location, distance, rating, comments) {
this.name = name;
this.location = location;
this.distance = distance;
this.rating = rating;
this.comments = comments;
}
}
export default class App {
constructor() {
this.hike = new Hike(
"Tricky Trails",
"Lakebed, Utah",
10.4,
4,
"This hike was nice and hike-like. Glad I didn't bring a bike."
);
this.hikes = [
new Hike(
"Tricky Trails",
"Lakebed, Utah",
10.4,
4,
"This hike was nice and hike-like. Glad I didn't bring a bike."
),
new Hike(
"Mondo Mountains",
"Black Hills, South Dakota",
20.86,
3,
"Not the best, but would probably do again. Note to self: don't forget the sandwiches next time."
),
new Hike(
"Pesky Peaks",
"Bergenhagen, Norway",
8.2,
5,
"Short but SO sweet!!"
),
new Hike(
"Rad Rivers",
"Moriyama, Japan",
12.3,
4,
"Took my time with this one. Great view!"
),
new Hike(
"Dangerous Dirt",
"Cactus, Arizona",
19.34,
2,
"Too long, too hot. Also that snakebite wasn't very fun."
)
];
}
chooseHike(arg) {
this.hike = arg.data;
}
}Now we should be getting a feel for how data might flow through our Fuse app and how different views will start to interact.
What's Next
While being able to select from our list of hikes is really helpful, we'll ideally want to separate the parts of this view into separate views entirely. In the next chapter, that's exactly what we'll do - we'll separate our views, and models into organized, isolated components. Let's dig in!
The final code for this chapter is available here.